For the month of September, I decided on a Vintage themed bullet journal spread, based on a stationery haul I did for my birthday last month. I have a post on my birthday stationery haul, where you can get some ideas on gifting options for stationery lovers.
 |
| Vintage themed bullet journal spread |
DISCLAIMER – This post may contain affiliate links, which means we may receive a commission if you click a link and purchase something that we recommended! You can read my full disclosure here.
What I used to make this vintage spread
- Alphabet stamps
- Vintage Paper DIY (you can even buy it here at Craft Villa India, if you don’t want to DIY)
- Vintage washi tapes (From Washi Sabi’s Instagram shop)
- Vintage stickers
- Circle stickers DIY (black and brown)
- Kraft Paper
- Black Scrap Paper
(All of these are stationery I got for my birthday.)
Also read – How I made DIY vintage paper at home?
By the way, if you want good quality vintage paper, Craft Villa India has some great choices, at affordable rates.
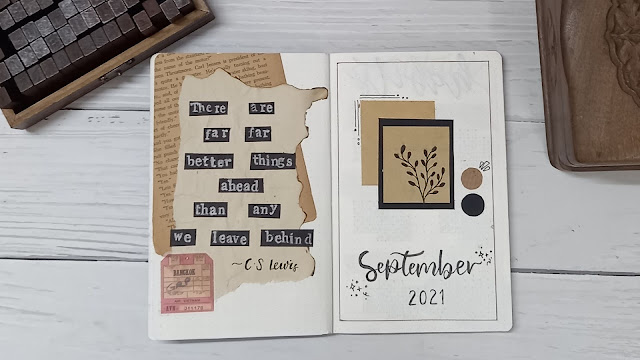
Vintage Cover Page and Quote Page
Cover Page
For my cover page, I was inspired by a spread made by cynthiabujo on Instagram. I wanted to give my cover page a simple and minimal look, using the vintage colour tones (mostly black and light brown).
Quote Page
For the quote page, I went with a layering style, wherein I first stuck a page of an old book and then stuck some vintage paper. Though I made this vintage paper at home, you can buy similar paper here.
Then, I stamped the words from the quote into some black scrap paper. I used my silver metallic Doms brush pen as the ink for my stamps so that they would be visible on the black paper.
I went with this quote from C.S. Lewis
There are far, far better things ahead than any we leave behind.
Vintage Habit Tracker and Gratitude Spread
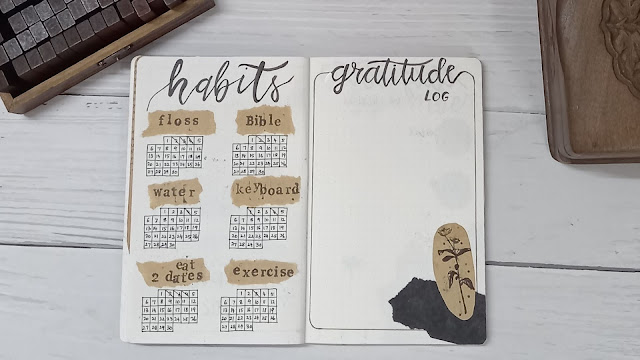
Vintage Habit Tracker
The habits I am tracking this month are reading the Bible, flossing, exercise, keyboard practice, drinking 2 bottles of water and eating 2 dates everyday. For this spread, I took some kraft paper and tore it into little bits and stamped in the headings using my alphabet stamps.
Vintage Gratitude Spread
For this spread, I stuck a bit of black scrap paper in the bottom of the page. I then took some kraft paper, stamped a floral doodle and cut it out in the shape of the flower. I stuck this on top of the black paper.
Vintage Goals Page and Review Page
Monthly goals is a spread I started making last month as to what goals I wanted to achieve by the month end. To make the review page, I used the circle stickers for the headings.
For the goals page, I again went with a layering style. For the first layer, a torn bit of kraft paper, next an old newspaper, and then, a plant sticker, which is from my coffee sticker set.
Vintage Content Planner
I felt last month was quite chaotic, when I tried to combine both my social media and my blog. So, this month I decided to split my content planner to make one spread for each.
I used the vintage grid paper I made, and turned it into of notepad doodle. I then added other elements like stickers and washi tapes. Everything I’ve used will be part of next week’s blog post, and I will link everything in that.
Vintage Monthly Spread
This monthly spread was extremely simple. I took a vintage paper I made, stuck it onto my bujo paper and I trimmed the edges. I did a calendar style layout as always and left it at that.
Also read – How I made DIY vintage paper
The only thing I did was stamp in the days of the week and the heading.
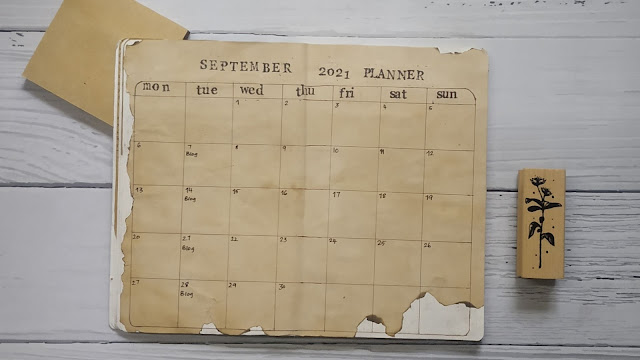 |
| Vintage themed monthly spread for bullet journaling |
Vintage Weekly Spreads
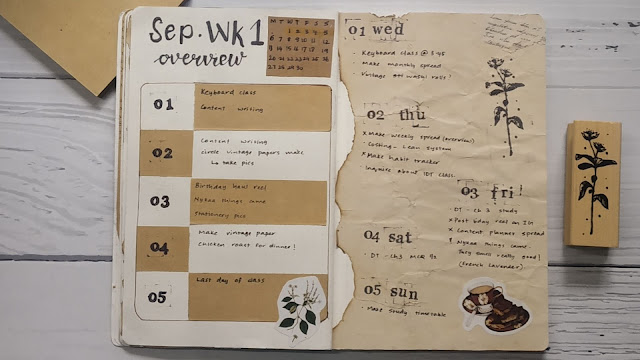
This month, I incorporated a new spread which is my “week overview”. In this spread, I list out what my events for the week are and what blog related tasks I have to do each day.
After this spread, I make my weekly spreads. I used my vintage washi tape, which I got from Washi Sabi’s Instagram shop and my DIY vintage paper to make the weekly spreads.
I also used my floral doodle stamp and my coffee sticker to finish the spread.
That is all for my spread this week. I hope I was able to give you some ideas, for your vintage themed spread. Check out my birthday stationery haul post and how I made my DIY vintage papers and stickers at home!
Please let me know what you thought of this spread and leave any questions you might have in the comments.
 |
| Vintage themed bullet journal spread |
DISCLAIMER – This post may contain affiliate links, which means we may receive a commission if you click a link and purchase something that we recommended! You can read my full disclosure here.
What I used to make this vintage spread
- Alphabet stamps
- Vintage Paper DIY (you can even buy it here at Craft Villa India, if you don’t want to DIY)
- Vintage washi tapes (From Washi Sabi’s Instagram shop)
- Vintage stickers
- Circle stickers DIY (black and brown)
- Kraft Paper
- Black Scrap Paper
(All of these are stationery I got for my birthday.)
Also read – How I made DIY vintage paper at home?
By the way, if you want good quality vintage paper, Craft Villa India has some great choices, at affordable rates.
Vintage Cover Page and Quote Page
Cover Page
For my cover page, I was inspired by a spread made by cynthiabujo on Instagram. I wanted to give my cover page a simple and minimal look, using the vintage colour tones (mostly black and light brown).
Quote Page
For the quote page, I went with a layering style, wherein I first stuck a page of an old book and then stuck some vintage paper. Though I made this vintage paper at home, you can buy similar paper here.
Then, I stamped the words from the quote into some black scrap paper. I used my silver metallic Doms brush pen as the ink for my stamps so that they would be visible on the black paper.
I went with this quote from C.S. Lewis
There are far, far better things ahead than any we leave behind.
Vintage Habit Tracker and Gratitude Spread
Vintage Habit Tracker
The habits I am tracking this month are reading the Bible, flossing, exercise, keyboard practice, drinking 2 bottles of water and eating 2 dates everyday. For this spread, I took some kraft paper and tore it into little bits and stamped in the headings using my alphabet stamps.
Vintage Gratitude Spread
For this spread, I stuck a bit of black scrap paper in the bottom of the page. I then took some kraft paper, stamped a floral doodle and cut it out in the shape of the flower. I stuck this on top of the black paper.
Vintage Goals Page and Review Page
Monthly goals is a spread I started making last month as to what goals I wanted to achieve by the month end. To make the review page, I used the circle stickers for the headings.
For the goals page, I again went with a layering style. For the first layer, a torn bit of kraft paper, next an old newspaper, and then, a plant sticker, which is from my coffee sticker set.
Vintage Content Planner
I felt last month was quite chaotic, when I tried to combine both my social media and my blog. So, this month I decided to split my content planner to make one spread for each.
I used the vintage grid paper I made, and turned it into of notepad doodle. I then added other elements like stickers and washi tapes. Everything I’ve used will be part of next week’s blog post, and I will link everything in that.
Vintage Monthly Spread
This monthly spread was extremely simple. I took a vintage paper I made, stuck it onto my bujo paper and I trimmed the edges. I did a calendar style layout as always and left it at that.
Also read – How I made DIY vintage paper
The only thing I did was stamp in the days of the week and the heading.
 |
| Vintage themed monthly spread for bullet journaling |
Vintage Weekly Spreads
This month, I incorporated a new spread which is my “week overview”. In this spread, I list out what my events for the week are and what blog related tasks I have to do each day.
After this spread, I make my weekly spreads. I used my vintage washi tape, which I got from Washi Sabi’s Instagram shop and my DIY vintage paper to make the weekly spreads.
I also used my floral doodle stamp and my coffee sticker to finish the spread.
That is all for my spread this week. I hope I was able to give you some ideas, for your vintage themed spread. Check out my birthday stationery haul post and how I made my DIY vintage papers and stickers at home!
Please let me know what you thought of this spread and leave any questions you might have in the comments.
Keep creating, keep planning! 💕

